Your home is beautiful and cozy, but it seems like it's missing something – a unique and stylish detail that adds individuality. A new piece of furniture, new wallpaper... no, you've had all of that in different variations so far. It needs to be something that impressed you specifically when you saw it in someone's home, like wall cladding.
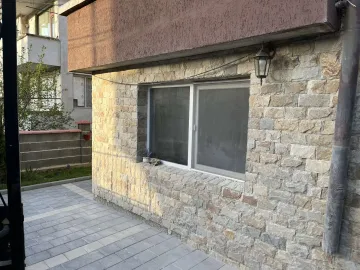
The answer comes right away – interior wall cladding with natural stone that transforms a monochrome wall.
Because you want a corner in your home built with a product of nature that reflects its natural, beautiful, perfect imperfections and durability.
Before purchasing wall cladding, you need to answer a few important questions to ensure you are making the right decision.
Can I choose between different types and colors of wall cladding?
We offer an exceptionally rich assortment of sizes and colors of natural stone, turning your ordinary wall or column into a striking and modern interior sensation.
What is Splitface cladding?
Processed splitface stone represents machine-cut tiles from natural stone with hand-carved relief that follows the natural texture of the stone. The purpose of additional processing is to highlight the natural beauty and color richness of the natural material.
Stone cladding is suitable for both external and internal use. The idea of splitface stone is to stand out with textural contrast and attract the eye. Designers plan for stone-clad surfaces to be a focal point and a central accent in interior and exterior design.
Is decorative stone cladding a good investment?
Everything borrowed from nature provides unique advantages. Natural stone is not painted cement but a robust and environmentally friendly product with qualities that can be harnessed by bringing it into your home.
For example, stone cladding is dust-repellent, pressure-resistant, noise- and heat-insulating, and fire-resistant (class A1).
Stone is a product created by nature over thousands of years: there is no mediocrity, compromise, or kitsch. Investing in natural materials is a decision that will inspire generations ahead.
Where can I place it in my home?
Whether you want to enhance the interior/exterior of your own home or you are an interior designer caring for the look of your client's home, you can unleash your imagination.
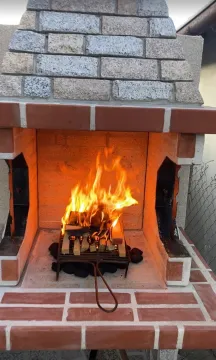
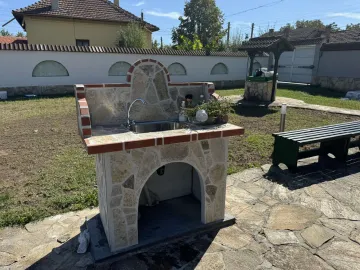
With stone cladding panels, rooms are decorated easily, quickly, cost-effectively, and hassle-free. You will see for yourself how this seemingly light accent completely transforms your column, fireplace, or wall in the kitchen, living room, or bedroom.
Can I preview the appearance in advance?
When painting, it's easy to imagine how a given color will look in your home, and you may be concerned that you can't visualize the entire stone cladding. That's why "Raimar" clients can order free samples of the desired natural stone cladding before the actual project implementation. As with any building material, the beauty of stone cladding depends on how well the stone surface is selected, adhered, and grouted. The most effective option is to order ready-glued panels of natural stone, minimizing tile cutting, eliminating dust, risk, and fear of the final result.
What are the advantages of interior stone cladding panels over standard cladding?
Interior stone panels free you from the dependence, mood, and possibilities of the master. The installation is faster, easier, and often more cost-effective, and even you, as a beginner enthusiast, can take care of it. Stone panels are glued without joints to any surface with mounting adhesive. To make it as easy as possible, the packaging is practical – in a box with about 1 sq.m, weighing around 30 kilograms, and ordering is quick and easy online, with courier delivery.
Interior stone cladding from a company with years of experience
We are a Bulgarian family company manufacturing garden products, cladding, and natural stone coverings. Trust in our products has brought satisfaction to many customers who have already realized their dream of a cozy and modern home.
Natural stone at home: More DIY Installation Guidelines
First: don't forget to choose and order your samples for stone cladding
Don't worry: if you're enthusiastic and eager to start, we're sure you'll manage on your own or with a little help from a friend/professional. The good news is that you are trying new things, having fun, and success depends solely on you.
The most enjoyable moment is the challenge of creating something with your own hands and giving a gift to your family.
We start with the list of necessary tools and materials.
You will need:
Stone-shaped tiles (quantity with about 10% more than the actual area due to breakage); Flexible stone adhesive; Masking tape; Master level; Tape measure; Rubber mallet; Container/bucket for the adhesive mixture and stirrer; Sponge float; Notched trowel; Small mortar or spatula; Pads and spacers; Diamond blade flex cutter; Work gloves; Rags; Pencil/chalk.
Step 1: Safeguard the floor with plastic and tape it with masking tape if necessary to ensure you keep nearby areas clean.
Step 2: Ensure that all surfaces where the stone tiles are to be glued are clean, dust-free, and structurally sound.
Step 3: It's easier if you arrange the stone tiles in rows on the ground before gluing the corresponding row. This way, you'll get an idea of the final result on the wall. If you have edge tiles, start gluing from there (see step 8).
Step 4: Don't mix the adhesive until you're ready with the first three steps. Follow the instructions on the packaging to make the adhesive mixture. Stir carefully with a stirrer until you get a homogeneous mixture. The adhesive should be neither too liquid nor too thick for easy application – the consistency is like melting ice cream or honey.
Step 5: Start arranging from bottom to top. Choose your installation method from the pictures below: with grout (brick-type) or without grout (linear). Apply the adhesive "on the comb" on the wall using the notched trowel. Also, apply adhesive to the back of each stone tile using a float or spatula. Press the stone into place and level it with a rubber mallet for a good bond. Level each tile. Plastic spacers or dividers greatly help maintain a right angle and leveling.
Step: Make sure before placing the stone tiles that there are no smudges of adhesive on the edges. If adhesive oozes out, clean it immediately with a sponge and a damp cloth while it's still wet, as it will be almost impossible later on.
(Note: Bulgarian units of measurement and tools are used in the translation.)
Step 6: Make sure, before placing the stone tiles, that there are no smudges of adhesive on the edges. If adhesive oozes out from anywhere, clean it with a sponge and a damp cloth immediately while it's still wet, as it will be almost impossible at a later stage.
Step 7: At the ends of the wall or internal corners: place the tile in position, measure with a tape measure, mark the cutting place on the tile with chalk, and cut with a diamond blade. Know that the last 10% of the achievement generates 1/3 of the costs and 2/3 of the problems. Cut the tiles somewhere outside where you don't worry about creating dust.
Step 8: If you need to clad wall edges, start gluing from there. We recommend a border with the meeting point of two tiles with a cut edge at a 45-degree angle, a chess-like arrangement through the row, or hiding internal walls with a lateral extension of the facing.
Step 9: Once finished, clean the surface with a clean damp cloth to remove any remaining dirt from the stone surface.
Step 10: We recommend always protecting the stone cladding with an impregnator. If you prefer to deepen the colors of the stone, use the "Wet Effect" impregnator. The universal impregnator protects without changing the natural colors.
Arrangement methods of shaped natural stone tiles:
BRICK TYPE with grout (equal spacing is left between all tiles without grouting: Use dividers and spacers to ensure an even grout width.)
We sincerely wish you success! We hope that you will be satisfied with the final result with a home and stone that firmly stand in their place.
And as a final note, we would like to quote the great Plato:
"A man who makes everything that leads to his happiness dependent upon himself and not upon other men has adopted the very best plan for living happily."


 Български